Tuesday, January 31, 2012

A Winter's Soup

The recipes I've shared in the past have, for the most part, been slightly modified knock-offs of the creations of more brilliant chefs than I.  But for the first time, I actually concocted my own recipe... choosing the ingredients, keeping track of amounts, and typing it out.  Though in reality it's a simple bean soup, which tends to sound boring and Great Depression, it was easy and delicious!

A Winter's Soup
1/2 cup dried pinto beans
1/2 cup dried kidney beans
1/2 cup dried Great Northern beans
1/2 cup millet
1/2 cup barley
4 cups water (enough to cover the above ingredients)
4 cups chicken broth (diced beef would work, too)
1 32-oz jar home canned tomatoes, drained (or store-bought)
Cooked leftover chicken
Salt and pepper to taste

Around 9:00 in the morning, put the first six ingredients into the crock pot and set on high.   About an hour or so later, check the beans and see if they’re softening.  If they are, throw in everything else but the chicken and switch to low.  Check occasionally and add water as needed to reach desired consistency.  About an hour before dinner, add in the leftover chicken to heat through (you could also throw in some sliced carrots, celery, and potatoes).  Serve with bread and salad.  Makes about 6 servings.  Or you could double it and freeze some.

Alternately, I imagine you could put everything but the chicken (and optional veggies) in the crock pot and just set it on low from the onset.  I was concerned the beans wouldn’t soften enough, though, so I set it on high initially as mentioned above.

Monday, January 23, 2012

Who's Afraid of the Big, Bad Rooster?

I am.  Seriously.  Remember this guy?


He recently decided that I'm another rooster.  So what did I do?  I Googled some advice.  And Google said it's time for the empress to strike back.  Okay.  So the next time he turned his spurs on me, I didn't back down.

And now he hates me.

Today as I was about to leave the garden, he was literally pacing the fence next to me, waiting for me to exit and then blindly turn my back so he could sink his filthy talons into whichever part of my body was most accessable.  Luckily, I was fully aware of his rather conspicuous strategy and was able to defend myself, walking away unscathed.

In an attempt at amnesty, Byron (who has also been attacked by said animal) snatched the rooster off his roost and brought him into the house tonight so I could pet him. Akea loves the nasty little thing and was actually resting her head on his greasy neck. I pet him, made appropriate cooing noises, and even tried feeding him some wheat berries. All went well until he bristled at me.

So after returning the varmint to his roost, Byron Googled some more advice.  This time, Google said to back down to the rooster and give him treats.  Well, thanks a lot, Google!  Wish you'd told me that the first time!  I will attempt this strategy tomorrow, though I'm not too sure about the backing down part.  I'm willing to try treats again, but I just have issues with backing down to an eight pound animal who wants his (literal) pound of flesh from me.

     "But," you may ask, "didn't you just say you were afraid of him? Isn't that, in essence, backing down?"
     "Yes," I answer you candidly.  "I am afraid of the big, bad rooster."  Let me draw an analogy: You know how when someone tells you not to think of pink elephants (or roosters, as in my case), all you can think of are pink elephants?  It's the same thing with this piece of timeless wisdom: Animals can sense fear, so don't act afraid around them.  So what's the first feeling I'm going to have when I see him waddling my way?  See my dilemma now?

Any advice?  He's actually a great rooster for the hens.  So though we'd love to be able to keep him, this is not my idea of livin' the dream!

I'm linking up to Homestead Revival's Barn Hop!  Click below to check it out:

Wednesday, January 18, 2012

Re-upholstery: What the Chair Reveals

This weekend I coaxed my seam ripper out of hiding and began the arduous task of re-upholstering one of the wingback chairs we purchased a while back.  Between ripping out staples and carefully labelling the pieces of old fabric that will serve as my template, I learned a few things.

First, I am not much of a planner (okay, maybe I knew this already).  When faced with a project, I like to get a few important details lined up; in this case, new fabric, a re-upholstery book I can refer to, a good pair of pliers, and a Sharpie.  I tried reading the entire re-upholstery book a couple months ago and I got a couple pages into it and gave up.  It meant very little without actually working on the project.

Secondly, the chair had been re-upholstered before, and some of the original fabric had been left intact.  Here's the spooky part: the original fabric looks almost exactly like the fabric we chose to re-upholster the chairs!  This means we're either old-fashioned or cool in a vintage sort of way.  I'm going to go ahead and say it's the latter.  Yup, that's it.  (Just humor me, okay?)

Revealing what's underneath.  I'm still unsure as to how much of the batting will need to be replaced.


A closer look at the original fabric.  Click here to see what we picked out.  It's downright freaky, I tell you.

You know how old furniture sometimes bulges out?  That's because the webbing (those brownish strips in the photo) have stretched out from the tension of the the springs and years of use.  These need to be re-stretched, though I'm hoping not replaced.

The first rule of re-upholstery seems to be to keep all the pieces you remove, so they can serve as your templates as you cut out the new fabric.  Here I've labelled one of the panels, and I am also keeping track of the order in which I remove the panels (hence, the "2nd" in the circle).  I admit that I sometimes have to force myself to do things like this, but I'm sure I will be glad I did!
I really, really, hope to complete this chair within the next week and a half, but that may be a somewhat optimistic outlook.  I do promise, however, to post the results (and any mishaps) when I am done!

Wednesday, January 11, 2012

January Calm...

...before the storm, which will come in the form of 660 S.F. of heart pine flooring that Byron will install this winter.  Until then, here's what's been going on:

Snow.  Which melted by the time I took this photo.

Rain.

Cozy chickens.

Cozy cows.
School.

And more school.

Fencing.
Painting.

Weeding.  Yes, thanks to a mild winter, I am still weeding the garden.  And then I feed the weeds to the chickens, and cover each row with a layer of compost, made from the horse manure which Byron diligently hauls from a farm 1/2 mile away. We will thank ourselves for this in the spring, right?
And soon to come, re-upholstery.  I promise.

Monday, January 2, 2012

A New Year, a New Name

Happy 2012!  As you may have read, a couple days ago Byron posted that much of the land we use has been in the family for 100 years.  If you missed it, click here to read his post.

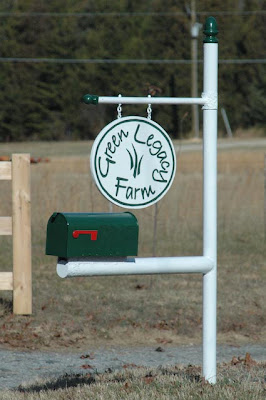
To that end, we have decided on a new name for the farm.  While Green Acres seemed kind of fun, kitchy, and appropriate given that Byron's great-grandparents were the Greens, a few months ago he came up with a name that better captures what we are trying to do: Green Legacy Farm.  Our main purpose in embarking on our farming adventure is to steward this land God has blessed us with so that we can both continue a legacy that began 100 years ago and leave something meaningful for future generations. 

As time allows, I am going to give the blog a facelift and look into changing the URL...but I will give plenty of warning.  And trust me, it won't happen right away.  This is going to be a large technological leap for the Luddite that I am, and it will probably involve late nights, tears, and threats to the life of my computer.

But here's something I want to share with you now: our new sign!  This sits at the top of our driveway, and was easier to make than you might think:

I want to go out today just so I can drive up and see this!

Leaving the driveway...
First, we already had the post.  It was dull, black, and in desperate need of a facelift.  It's amazing what a sixty degree day and a can of white spray paint will do!  I cleaned it up with a bit of sandpaper, first.

Next, the mailbox is new, and I spray painted it hunter green to match the color scheme.  The old one had been beaten to death by many a redneck.   I can remember guys from high school talking about bashing mailboxes and running over possums.  Let's pray the new sign (and the local possums) don't have the same fate.

Finally, the sign.  We bought an oval template from Home Depot and cut out a piece of plywood.  Next, I stuffed wood putty around the curved edge to seal any small holes.  After sanding, I primed and painted it white.  Then I printed out the lettering, cut out the letters, arranged them on the sign, and traced them with a pencil.  It took about three coats of green to make the lettering and design solid, but it dried quickly.

I feel like for all the renovation mess we're in right now, this is a glimpse into who we are.  We reused what we could, and for minimal cost ($25, maybe?) created something we're happy with.  And now one project is completely done!

And that, so far, makes for a very happy new year!

Click below to join in Homestead Revival's Barn Hop!