Last winter during the Snowpacolypse that pounded the southeast, Byron and I came up with a brilliant idea. Why not make homemade maple syrup? Grant you,
not the kind you make from sugar, cornstarch, and whatnot. I'm talking the real deal from our sugar maple tree that graces the front yard of Other House. Yeah, we're hardcore like that.
This year, we sadly decided that we're way too busy with indoor and outdoor projects to tackle sugaring season, since making maple syrup does require a certain amount of dedication, ventilation, and insanity. So since we won't be able to commit to the task, I wanted to write a post on the process for those of you who may want to give it a shot. All we plan to do is tap our maples to see if we get any sap, since we're now in a slightly warmer part of the state and maples like a cooler climate and don't grow as well here.
Seriously, it's fun and relatively simple to make your own maple syrup. Several types of maple trees exist, and the best for syrup-making are sugar maples. Any type of maple can be tapped, however, and even hickories and walnut trees will produce sap that can be boiled down into syrup. Sugar maples, however, tend to give you a better ratio of sap to syrup: 10 gallons of sap will yield one quart of syrup. And I should mention that trees must be 10" in diameter in order to be tapped. Our maple was pretty big, and we had three or four spiles in it.
Freezing temperatures at night that climb into the 40s and 50s during the day signal the beginning of sugaring season, since that's when the sap begins to flow inside the tree. If you have a tree you'd like to tap, you'll need to order spiles, which are like little spouts, online (google "maple syrup equipment"). The rest of the "equipment" you probably have on hand: a drill, wire, milk jugs, tubing, a thermostat, canning jars, and BIG POTS.
 |
| Step 1: Drill a hole, at a slight upward angle, 1½” into the tree and about three feet up from the ground. Byron marked the 1 1/2" point on the drill bit with some painter's tape. |
 |
| Step 2: Hammer the spile into the hole. This process does not hurt the tree; the hole will heal naturally after the season. |
 |
| Step 3: Hang a clean milk jug from the spout to collect the sap. We took a spile to a hardware store and found some plastic tubing that fit snugly over it, and ran that into the cap of the milk jug. And since we're classy like that, we just used some old wire to hang the jug from the spile. |
Keep in mind that sap
is perishable must be stored in the fridge and boiled down within a couple days. Choose a day that is relatively free of other activities, since you will need to add sap to the pot intermittently and will most likely not want to be testing out your first batch of syrup at 2 a.m. on a Sunday night. And I'm speaking from experience!
Most maple syrup producers recommend boiling sap outside because of the copious amounts of steam produced. But at home, a large pot - or two, depending on the amount of sap you've collected - on the stove will do.
Be sure to have decent ventilation. I'm not kidding; we had a fan blowing the steam toward an open window.
When you first get your sap boiling, you won't need to babysit it
too closely. You can check your e-mail, read a blog or two,
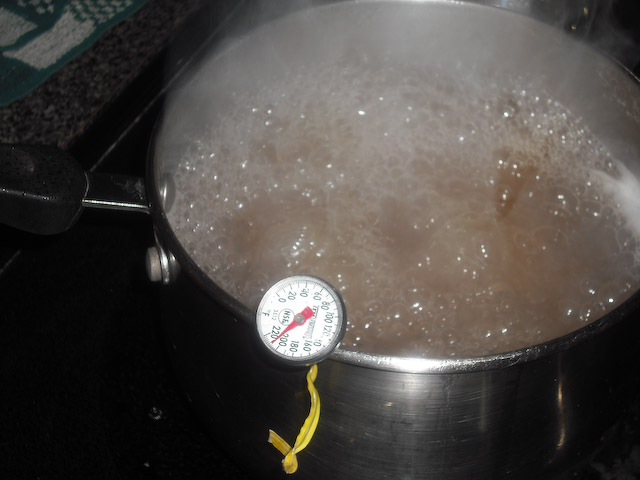
sterilize your canning jars, etc. But as the sap boils down, you'll want to maybe combine sap if you have two pots going, then eventually transfer it to a smaller pot to prevent burning. And because boiling points can vary due to altitude,
take the temperature of your boiling sap when you begin.
 |
| We began with a pot or two like this... |
 |
| ...and ended up with syrup in a much smaller pot. |
When the temperature of the sap reaches 7 degrees above boiling point, you have maple syrup! This part is both exciting and tricky because you need to be careful not to let it get too hot...then you'll end up with maple sugar. That may not be a bad thing, but it doesn't work too well on pancakes!
 |
| You'll need to filter your syrup into sterile canning jars immediately. We found that a clean t-shirt, cut up into squares, worked best. See? I told you we're classy. |
Whatever you use to filter the syrup, you'll need several of. We went through a few t-shirt squares each time because the pores of the cloth get clogged pretty quickly.
 |
| Our first two jars of maple syrup! A lot of sugar settled on the bottom of the right-hand jar because we didn't know we needed a fresh bits of t-shirt the first time we filtered. We ended up forcing a lot of the syrup - and consequently, sugar - through the already clogged pores of the cloth. But it still tasted great. |
Click here for a PDF we found to be helpful, and I'll answer any questions as best as I can. Happy Sugaring Season...I miss it already!


No comments:
Post a Comment